Showing posts with label Sides. Show all posts

Friday, October 14, 2011

Brazilian Cheese Bread (Pao de Queijo)

Picture taken from simplyrecipes.com

My apologies for my blogging lethargy :-/. Excuses can be made, such as, "oh I was busy moving", "oh, my sister's wedding", "oh, I'm just super lazy and forgetful". Yeah, probably the latter is mostly true...my bad! Anywho, I recently made this amazing and incredibly easy brazilian cheese bread this week and who better to share the recipe with than me fellow food bloggers. If you haven't heard of or visited Espetus in Hayes Valley, then I highly recommend you satiate your carnivorous itch and try this place. It is like a Brazilian, ALL-YOU-CAN-EAT meat buffet. Well, sort of buffet. Waiters circle your table with different cuts of meat for you to choose from, including chicken hearts. There is also a wonderful salad bar to accompany the meal, which may be overkill with the amount of meat that they serve you.

While waiting for our first round of meat, they bring out these absolutely great cheese bread appetizers for you to snack on. They were so good that our table requested multiple plates, in addition to the meat and salad bar. They were chewy, cheesey, puffy goodness.

Luckily, while perusing the food blogging world, I stumbled upon a recipe for pao de queijo. I love recipes that take no time to make and come out so great that you are likely to impress your friends with your "culinary skills".

Ingredients:
1 egg (room temp)
1/3 c. olive oil
2/3 c. milk
1/2 c. tapioca flour (found at Whole Foods - Bob's Red Mill)
1/2 c. packed grated cheese - used Queso Fresco
1 tsp. salt

Special Equipment: mini cupcake tin

Preheat oven to 400 degrees and lightly greaser cupcake tin.
Blend all ingredients in a food processor until smooth. The batter will be a smooth, runny consistency - more so than pancake batter.
Spoon 1 tablespoon of the batter into each cupcake holder.
Bake for 15-20 minutes (I did full 20 minutes) until puffy and golden. Be sure not to open the oven a lot cause the puffs will deflate.
When done, cool on rack and then consume immediately =).

**You can store extra batter in the refrigerator for up to a week.


Tuesday, February 15, 2011

Stuffed Mushrooms


Yesterday a group of us had a Valentines' day potluck dinner, and these stuffed mushrooms were my contribution. It's a super easy recipe - just requires some chopping and mixing and then you're essentially done! I love the end result because the dish is pretty unique and light, so you can fit a lot in your stomach at one time. The flavors come together really well, and Pecorino Romano cheese is super yummy.

Taken from Giada de Laurentiis on the Food Network website: http://www.foodnetwork.com/recipes/giada-de-laurentiis/stuffed-mushrooms-recipe/index.html


Ingredients

  • 1/2 cup Italian-style dried bread crumbs
  • 1/2 cup grated Pecorino Romano
  • garlic cloves, peeled and minced
  • 2 tablespoons chopped fresh Italian parsley leaves
  • 1 tablespoon chopped fresh mint leaves
  • Salt and freshly ground black pepper
  • 1/3 cup extra-virgin olive oil
  • 28 large (2 1/2-inch-diameter) white mushrooms, stemmed

    Directions

    Preheat the oven to 400 degrees F.
    Stir the bread crumbs, Pecorino Romano, garlic, parsley, mint, salt and pepper, to taste, and 2 tablespoons olive oil in a medium bowl to blend.
    Drizzle a heavy large baking sheet with about 1 tablespoon olive oil, to coat. Spoon the filling into the mushroom cavities and arrange on the baking sheet, cavity side up. Drizzle remaining oil over the filling in each mushroom. Bake until the mushrooms are tender and the filling is heated through and golden on top, about 25 minutes. Serve

    Monday, February 7, 2011

    A Smitten Feast


    Last week?...Two weeks ago? (whoa, time flies) I put together an impromptu dinner party with some close friends. The dinner party sort of snowballed from my impulse to make these two dishes that I have been eying for quite some time. The problem was that I could not consume these two dishes by my lonesome. I take that back. I definitely COULD consume these two dishes by my lonesome, but I really shouldn't and definitely not in one sitting. Henceforth, The Impromptu Dinner Party was born! Problem was, however, after inviting a few friends, I figured I will have to make MORE food. Well, not so much a problem, because I love to cook but a conundrum because I want to make sure that there is enough food to fill everyone, but not SO much food that I could have TWO impromptu dinner parties. Overall, I think it was a success! It was my first dinner that I have every hosted by myself and cooked every dish. Sort of a mini-challenge. At one point I had to make a timeline of when I would begin each dish so that most of everything would be ready to consume when the party-goers arrived.

    I pulled all of the recipes, minus one, from www.smittenkitchen.com. (hence, the name of the post =) I love this blog and I always highly recommend it! Because of the many recipes I used for the party, I will just post the links to each recipe and then add comments if I changed anything.
    Enjoy!

    *So incredibly good. The chicken turned out so moist and the juices from the chicken/garlic made an awesome gravy over the dish. I recommend using even MORE than 40 cloves of garlic.

    White Bean Roasted Red Pepper Dip: http://sm
    *A great and easy-peasy dip recipe. PLEASE drain the juices from the roasted red peppers. If not, it will make the dip very liquidy. This happened to me, so I added extra can of beans, which thickened it up nicely. Also recommend adding Hot Sauce/Chihula sauce to your taste. Adds a nice kick!

    Pearl Couscous w/Olives & Roasted Tomatoes: http://smittenkitchen.com/2007/07/pearly-whites/
    *One of my favorite go to recipes on this blog. Although it's easy and quite h
    ands off, it does take a while to roast the tomatoes (which you can do ahead of time) and cook/cool the couscous. Highly recommend for a potluck dish cause you serve it cold and can be made ahead of time.
    *Probably the biggest hit of the night. Again, a super easy and very hands off recipe. You don't even need to chop the mushrooms. Oh, I bought a jar of ready-to-use minced garlic, cause it is one of my pet peeves to chop/mince garlic. Seriously saves my sanity when cooking. If I possessed foresight I would have doubled this recipe because it was that good. Use bread to dip in the sauce.

    *I love risotto and I love butternut squash so this was the perfect combination. I didn't make the fried sage leaves...seemed too time consuming for such a small accent to the dish. Next time I would have roasted the butternut squash pieces for less time cause mine started to caramelize (which isn't bad at all!), but for this recipe I would have preferred just soft cubes. I love barely because it has more a bite to it than using arborio rice in a traditional risotto. I'd like to think that this is a slightly healthier version of risotto.

    Vanilla Roasted Pears w/Vanilla Bean Ice Cream: http://smittenkitchen.com/2009/12/vanilla-roasted-pears/
    *I've wanted to try roasted pears for quite some time because it seems so easy. It was easy, but I was sort of underwhelmed by the flavor. It seemed to lack a balance between the vanilla flavor and the pears. More pear-y than vanilla-y. And the pears didn't soften up that much even though I kept them in the oven for quite some time. I think I would recommend making them in a small baking dish or using more pears so that they almost touch when they are baking. Would have used a little more butter and vanilla in order to hike up the flavor and increase the sauce.

    Gotta admit, it was exhausting to cook all this food but I would love to host another dinner party...in the far...far...future =) Well, maybe this month =)

    Wednesday, January 12, 2011

    Sesame Pasta Chicken Salad


    I made this the day after Thanksgiving with leftover chicken from Thanksgiving dinner (my family eats chicken instead of turkey), and it turned out well. I had been looking for a chicken salad recipe for my leftover meat which didn't really use mayonnaise and came up with this in a Google search. I recently made this salad earlier in the week for my mom to take to lunch... and she loved it! To be a bit healthier, I used whole wheat pasta instead of regular pasta. For the chicken, I just seasoned some chicken breast and roasted it in the oven for about 30 minutes at 350 degrees.

    Original link: http://blogchef.net/sesame-salad-recipe/

    Ingredients:
    1 (16 ounce) package bow tie pasta
    ¼ cup sesame seeds
    ½ cup vegetable oil
    1/3 cup rice vinegar
    1/3 cup soy sauce
    1 teaspoon sesame oil
    3 tablespoons sugar
    ½ teaspoon ground ginger
    ¼ teaspoon black pepper
    3 cups cooked chicken (shredded or cut into small chunks)
    1/3 cup cilantro (chopped)
    1/3 cup green onions (sliced)


    Step 1:  Heat a skillet over medium high heat. Add sesame seeds and cook while stirring until they are lightly browned. Remove from heat and set aside. Bring a large pot of water to a boil and cook according to package direction until Al Dente. Drain pasta and cool. Transfer to a large serving bowl.


    Step 2: In a jar with a tight fitting lid combine vegetable oil, rice vinegar, soy sauce, sesame oil, sugar, ginger, black pepper and sesame seeds. Shake well.

    Step 3: Pour the dressing over the noodles. Add chicken and mix well. Add green onions and cilantro and serve.


    (Makes 4 Servings)

    Thursday, January 6, 2011

    Warm Potato Salad with Goat Cheese


    I got this recipe from the New York Times, and it's awesome. I'm a huge fan of potato salad, but I hate anything with too much mayonnaise. So this recipe is perfect because instead of mayonnaise, it uses goat cheese. It also differs nicely from standard potato salads because it uses a vinaigrette dressing, and it's served warm.

    You can use Yukon golds, fingerlings or red bliss potatoes for this warm, creamy salad. The goat cheese melts into the dressing when you toss it with the hot potatoes. 


    For the dressing:

    • 1 tablespoon white wine vinegar or sherry vinegar (can also use regular vinegar)
    • 1 tablespoon freshly squeezed lemon juice
    • Salt to taste
    • 1 teaspoon Dijon mustard
    • 1 small or medium garlic clove, minced or pureed
    • 1/3 cup extra virgin olive oil, or for a low-fat dressing use 1/4 cup low-fat yogurt or buttermilk and 2 tablespoons extra virgin olive oil

    For the salad:

    • 1 1/2 pounds Yukon gold, fingerling or red bliss potatoes
    • Salt and freshly ground pepper to taste
    • 2 to 4 tablespoons finely chopped red onion (to taste), rinsed with cold water and drained (NOTE: You can use regular onions, and add more if you desire - I always do!)
    • 2 tablespoons chopped flat-leaf parsley
    • 2 ounces soft goat cheese
    • 2 to 3 sage leaves, cut in thin slivers (optional)

    1. Make the dressing. Whisk together the lemon juice, vinegar, mustard, salt, pepper, and garlic. Whisk in the olive oil or the yogurt and olive oil. Taste and adjust seasonings, Set aside.

    2. Scrub the potatoes and cut into 3/4-inch dice if large. If using fingerlings cut in 3/4 inch slices. Steam above 1 inch of boiling water until tender but not mushy, about 10 to 12 minutes. Remove from the heat and toss while hot in a bowl with salt and pepper to taste, the onions, parsley, goat cheese, and the dressing. Sprinkle the sage over the top and serve.

    Yield: Serves 6

    Advance preparation: You can make the dressing several hours before making the salad.

    Notes: Instead of steaming the potatoes, I'll simply drop them into boiling water and remove them right when they become soft. You don't want to put them in for too long because they'll get mushy. The potato salad also tastes great with small cubes of chicken breast mixed in.

    Monday, January 3, 2011

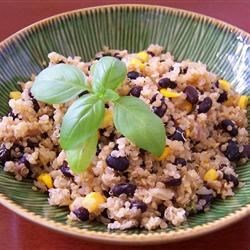
    Quinoa and Black Beans


    I found this dish on Allrecipes.com (AMAZING place to find recipes). Great, healthier substitute for beans and rice. Enjoy! VEGETARIAN FRIENDLY!

    Ingredients:
    • 1 tsp veg oil
    • 1 onion, chopped
    • 3 cloves garlic, peeled/chopped
    • 3/4 c. uncooked quinoa
    • 1.5 c. vegetable broth
    • 1 tsp ground cumin
    • 1/4 tsp cayenne pepper (more if you like spicyyyy)
    • salt/pepper to taste
    • 1 c. frozen corn kernels (canned is fine, too)
    • 1 can (15 oz) black beans, rinsed and drained (it calls for 2 cans but 1 is plenty)
    • 1/2 c. chopped fresh cilantro (optional)
    Directions:
    1. Heat oil in medium saucepan over medium heat. Stir in the onion, garlic, and saute until lightly browned.
    2. Mix quinoa into the saucepan and stir in vegetable broth. Add cumin, cayenne pepper, salt/pepper.
    3. Bring mixture to a boil. Cover, reduce heat, and simmer for 20 min.
    4. Stir frozen corn into saucepan, and continue to simmer about 5 more min until corn is heated through.
    5. Add black beans and cilantro. (Add corn last with black beans if using canned version).
    6. Fluff with a fork and enjoy!
    Optional, I've also added some other veggies, like bell peppers to make a more colorful/veggie variation. Add it in when adding the onion.

    Nutritional values per serving: (Makes 10 servings)
    Calories: 142
    Total Fat: 1.7 g
    Cholesterol: o mg
    Sodium: 467 mg
    Total Carbs: 25.6 g
    Dietary Fiber: 6.9 g